You don't need to do step 1 to 4 when the database and table/data exists. This is for demo and completeness purposes. You can directly jump to step 5
1.Create database
CREATE DATABASE MyPartitionDB
2. Create table
CREATE TABLE mytableToPartition(MyId INT IDENTITY(1,1), LastUpdated datetime)
3. Populate sample data
declare @timedate datetime
set @timedate = DATEADD(YEAR, -10, GETDATE())
while @timedate < '20121010'
begin
INSERT INTO mytableToPartition (LastUpdated)
values (@timedate)
set @timedate = DATEADD(MINUTE, 20, @timedate)
end
4. Create Index on existing table
CREATE clustered index CL_MyId on mytableToPartition(MyId)
The idea is to move all the data that is created before 2009 as archive and the others as one year partition. Effectively
< 1 Jan 2009
Jan 1 2009 to 31 Dec 2009
Jan 1 2010 to 31 Dec 2010
>= Jan 1 2011
Which means we will have four partitions.
5. Create Filegroups and add file to each Filegroup. For demo purpose I added only one file per Filegroup. As you can see below I created four Filegroups. One Filegroup for each partition. But, you don't have to create four Filegroups. You can use only one Filegroup for all partition but it is better for maintenance purposes and if you want move one Filegroup to different spindle it make it much easier.
ALTER DATABASE MyPartitionDB ADD FILEGROUP FG1;
ALTER DATABASE MyPartitionDB ADD FILEGROUP FG2;
ALTER DATABASE MyPartitionDB ADD FILEGROUP FG3;
ALTER DATABASE MyPartitionDB ADD FILEGROUP FG4;
-- now add file to each filegroup
ALTER DATABASE MyPartitionDBADD FILE(name='FG1',FILENAME='C:\temp\fg1.ndf') TO FILEGROUP FG1
ALTER DATABASE MyPartitionDB ADD FILE(name='FG2',FILENAME='C:\temp\fg2.ndf') TO FILEGROUP FG2
ALTER DATABASE MyPartitionDB ADD FILE(name='FG3',FILENAME='C:\temp\fg3.ndf') TO FILEGROUP FG3
ALTER DATABASE MyPartitionDB ADD FILE(name='FG4',FILENAME='C:\temp\fg4.ndf') TO FILEGROUP FG4
6. Create partition function and scheme
GO
-- create partition function
CREATE PARTITION FUNCTION MyPartitionFunciton (datetime)
AS RANGE RIGHT FOR VALUES ('20090101', '20100101', '20110101');
GO
-- create partition scheme
CREATE PARTITION SCHEME MypartitionScheme
AS PARTITION MyPartitionFunciton TO (FG1,FG2,FG3,FG4)
GO
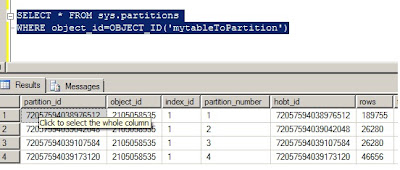
7. See current status of our table. Up to now our table is in a default partition. See figure below.

8. Move table to partition based on LastUpdated column of the table.
To perform this, I need to drop the index and recreate it on partition scheme that I have created above.
-- drop existing index
DROP INDEX mytableToPartition.CL_MYID
-- re-create index on the partitionscheme
go
CREATE CLUSTERED INDEX CL_MYID on mytableToPartition(myid) on MypartitionScheme(run_date)
Just by creating my clustered index on partition scheme moved all the data in their respective partition. see result set below.

Let us now see where the our data has gone. The following query will show us the Maximum lastupdated value in particular partition, partition number and total number of rows in each partition. See the output result below.

In part II, I will show how easy it is to move archived data and able to delete without affecting performance of your system.
1 comment:
Simple step by step on how to partition a table. I never got my head around about partitioning but have used your steps and got all in my head now.
Thanks for the great explanation
Post a Comment